

I am going to do a review and picture install of the newly released on board air system from Air Werkz (www.airwerkz.com)
This system consists of a 3 gal. Air tank, and either 1 or 2 VIAIR 400C compressors, and all the fittings and hoses to install it. The unique thing about this new kit it's that it comes with a newly designed mounting system that places all the components under the jeep. It mounts between the drive shaft and the exhaust resonator and attaches to the frame mount of the Evap resivor and the forward cross member.
Additional options are available like air gauge, adapter fitting for SPod, hoses etc.
The install is relatively simple and only requires drilling one hole for mounting the system, one to mount the Q/C air fitting and basic wrenches. However plan on a good 1/2 day + to complete the installation.
So lets get started.
![]()
The air tank is well made with 2 ports on both ends and a drain port on the bottom. As it sits in the picture on my bench, the tank is actually upside down
![]()
I opted for the dual 400C compressors. They are very nice and standard Viair quality. The come with stainless braided output lines on the compressors
![]()
And this the heart and soul of the system, the mounting bracket. As it sets on the bench, you are looking at the top side of the mount, and the side that is closest to the muffler.
![]()
The kit comes with a 6 port manifold, 4 center ports and one on each end. Plenty of room to plumb what ever you need.
![]()
And lastly the fittings for installing all the plumbing.
Now lets start putting everything together.
Before you start mounting all the components to the mounting bracket, you must first test fit it under the jeep and DRILL one mounting hole in frame crossmember.
![]()
The rear of the mount goes between the evap canister skid plate and the frame. You will re use the 2 factory bolts to mount it. Do not tighten the bolts at this time as you will need to align the front mounting holes.
![]()
The one side of the front mounting plate will line up with a factory hole in the front crossmember.
![]()
The other side will need to be drilled thru the crossmember as shown above.
Once the hole is drilled, you can remove the mounting bracket and proceed to the work bench so you can assemble all of the components.
Part 2 next
This system consists of a 3 gal. Air tank, and either 1 or 2 VIAIR 400C compressors, and all the fittings and hoses to install it. The unique thing about this new kit it's that it comes with a newly designed mounting system that places all the components under the jeep. It mounts between the drive shaft and the exhaust resonator and attaches to the frame mount of the Evap resivor and the forward cross member.
Additional options are available like air gauge, adapter fitting for SPod, hoses etc.
The install is relatively simple and only requires drilling one hole for mounting the system, one to mount the Q/C air fitting and basic wrenches. However plan on a good 1/2 day + to complete the installation.
So lets get started.
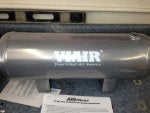
The air tank is well made with 2 ports on both ends and a drain port on the bottom. As it sits in the picture on my bench, the tank is actually upside down

I opted for the dual 400C compressors. They are very nice and standard Viair quality. The come with stainless braided output lines on the compressors

And this the heart and soul of the system, the mounting bracket. As it sets on the bench, you are looking at the top side of the mount, and the side that is closest to the muffler.

The kit comes with a 6 port manifold, 4 center ports and one on each end. Plenty of room to plumb what ever you need.

And lastly the fittings for installing all the plumbing.
Now lets start putting everything together.
Before you start mounting all the components to the mounting bracket, you must first test fit it under the jeep and DRILL one mounting hole in frame crossmember.

The rear of the mount goes between the evap canister skid plate and the frame. You will re use the 2 factory bolts to mount it. Do not tighten the bolts at this time as you will need to align the front mounting holes.

The one side of the front mounting plate will line up with a factory hole in the front crossmember.

The other side will need to be drilled thru the crossmember as shown above.
Once the hole is drilled, you can remove the mounting bracket and proceed to the work bench so you can assemble all of the components.
Part 2 next


