Hey guys
I've recently scored a fairly good deal on pair of 2015 Rubi axles with less then 6000 miles on them and finally got them installed the last weekend.
Axles are complete assembly takeoff, with brakes, ABS sensors and cables, tie rod and even with the drag link so it was pretty straight forward swap.
Here's the write up that might be useful for those folks who thinking about doing the axle swap.
I did this project in my garage mostly by myself with some help from my wife
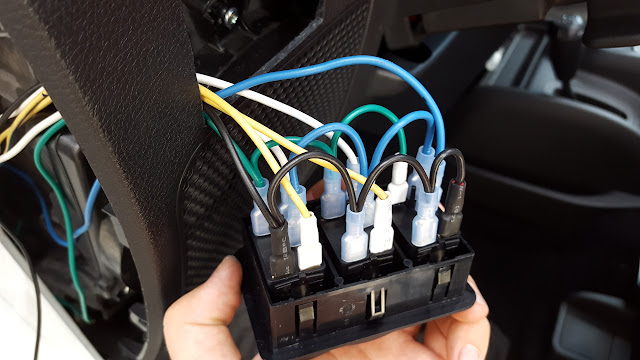
The whole job took around 12 hours split in two days. Front axle took 7 hour including lunch break and two runs to a hardware store, rear was ~5 hours including some wiring and soldering work for the rear locker harness.
So here we go:
![Image]()
Tools needed:
I also highly recommend an impact wrench. It is a superb tool that worth its price just for this project alone, not to mention other DIY things.
I used my two impacts: 1/2" drive 18v Craftsman C3 Heavy Duty and small but mighty 12v Milwaukee M12 Fuel with 3/8' drive. Craftsman had zero problems with removing lug nuts, control arms and track bars bolts. M12 worked great for all smaller stuff.
(Some photos has been taken afterwards, so if you see some stuff that supposed to be removed on previous steps - just ignore it)
Front removal:
Front install:
Rear removal:
Rear Install:
Obviously, some of those steps can be done in different order. You may install brake calipers after installing the shocks or connect ABS cable before the parking brake, it really doesn't matter.
You may connect driveshaft before installing the wheels, but I'm a bit of a work safety freak and just don't feel comfortable crawling under the jeep with wheels off.
Here's the final result:
![Image]()
Everything worked out fine - Jeep drives straight, only needed a minor adjustments for the steering wheel centering.
Going from 3.21 to 3.73 feels absolutely awesome!
I also swapped my soft 14/56 springs for 18/58 and got ~1.5 inches lift front and rear.
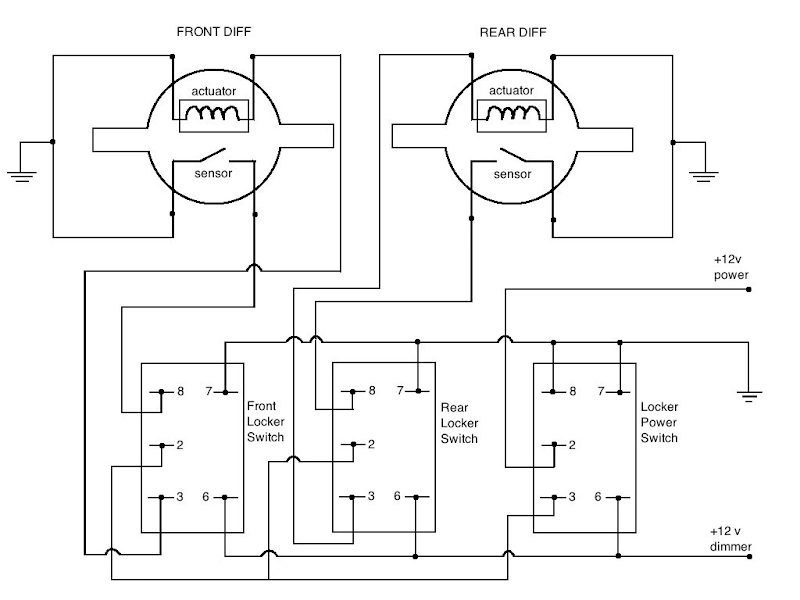
Looking forward to doing a locker wiring soon.
P.S. For the record - two the most frustrating steps in the whole process:
I've recently scored a fairly good deal on pair of 2015 Rubi axles with less then 6000 miles on them and finally got them installed the last weekend.
Axles are complete assembly takeoff, with brakes, ABS sensors and cables, tie rod and even with the drag link so it was pretty straight forward swap.
Here's the write up that might be useful for those folks who thinking about doing the axle swap.
I did this project in my garage mostly by myself with some help from my wife
The whole job took around 12 hours split in two days. Front axle took 7 hour including lunch break and two runs to a hardware store, rear was ~5 hours including some wiring and soldering work for the rear locker harness.
So here we go:

Tools needed:
- Floor jack - really a must have item. I can't imagine doing this job with a bottle jack or (God forbid!) scissor jack.
- Jack stands, 2 sets (two bigger 6 ton for the frame and two smaller 3 ton ones for the axle)
- Two 12"x18" furniture dollies. Got those from HF and they worked perfectly for this project. Moving axles around become an easy one mans job with these.
- Sockets: 8mm, 10mm, 15mm, 16mm, 18mm, 19mm, 21mm.
- Socket drive extensions and joints. I use assorted, from 1.5" up to 8".
- Wrenches: two 16mm (really need two to remove front shocks upper mounts), 18mm, 21mm. I think its always good to have at least two of each, not just 16mm.
- Ratchet with 3/8 and/or 1/2" drive.
- Torque wrench that goes up to 150 lbs*ft
- Hammer
- Some wood pieces
- Punch
- Big ass breaker bar
- Tie rod/pitman arm puller - REALLY recommend this thing! For just under 15 bucks this is a huge time saver!
- Long and strong zip ties.
I also highly recommend an impact wrench. It is a superb tool that worth its price just for this project alone, not to mention other DIY things.
I used my two impacts: 1/2" drive 18v Craftsman C3 Heavy Duty and small but mighty 12v Milwaukee M12 Fuel with 3/8' drive. Craftsman had zero problems with removing lug nuts, control arms and track bars bolts. M12 worked great for all smaller stuff.
(Some photos has been taken afterwards, so if you see some stuff that supposed to be removed on previous steps - just ignore it)
Front removal:
- Jack up the jeep, support for the frame with two 6t stands right behind the lower control arms brackets and for the axle with two 3t stands. Wheels should be off the ground, but not too high, i.e. suspension is not hanging free, but not under the full load either.
- Remove front driveshaft (four 15mm bolts), suspend shaft with zip tie
![Image]()
- Disconnect breather tube
- Remove wheels
- Disconnect sway bar links (lower bolts only) (18mm bolt and nut)
- Remove shocks (lower 18mm bolt and nut, upper 16mm nut)
- Remove brake line brackets (one 10mm bolt)
![Image]()
- Free the ABS cable from its brackets, then disconnect ABS sensor cable (plug is right behind the shock well). There is a red tab you need to pull back and then press on the top of connector and slide it out of the socket.
![Image]()
- Remove brake calipers (two 21mm bolts each) and set aside (brake lines are long enough to just lay them down on the ground)
- Remove the trackbar bolt (21mm bolt and nut with stopper)
![Image]()
- Carefully lower the axle until it rest on the dollies; disconnect the track bar. Its hard to keep front axle centered on the jack when lowing/lifting, so just lower one side at a time. Track bar should pop out free in the process.
- Remove springs (if they didn't fall out already)
- Remove drag link bolt (21mm), disconnect drag link from the knuckle (it pressed in really hard, use puller)
![Image]()
![Image]()
- Remove upper CA bolts (18 mm); disconnect upper CAs (should just pop out of the mounts)
![Image]()
- Remove lower CA bolts (21mm); disconnect lower CAs (you may need to swing axle back and forth to free them)
![Image]()
- Roll the axle out


Front install:
- Position axle on the dollies so the diff yoke points slightly upward and roll axle under the jeep.
- Connect the lower CAs. They should go back in their places relatively easy. Line up the holes and insert the bolt, do not put the nut yet
- Connect the upper CAs. This might be a little tricky and require some fiddling. Swing axle back and forth, jack it up a little if necessary. Eventually all holes should line up.
- With all CA bolts in - put the nuts back on and tighten them slightly. Do not tighten them to specs yet - just give them a spin so they set in place firmly.
- Lift axle and put the jack stands under it. Work incrementally, one side at a time.
- Reinstall the springs, make sure they sit correctly in their places. Its good to put springs in when lifting the axle, one side at a time.
- Connect the drag link to the knuckle, tighten the nut to specs
- Reinstall the brake calipers and brake line brackets
- Reinstall the ABS cable, connect the socket behind the shock well.
- Reinstall the shocks
- Connect the lower sway bar links to the axle, tighten the bolts
- Connect the track bar. You may need to lift the passenger side a little more until track bar hole lines up with its mount. Insert the bolt and nut, do not tighten it up yet
- Put the wheels on
- Reconnect the driveshaft (look for the yellow paint mark on both shaft and yoke to line it up correctly). Use some blue locktite on the bolts.
- Reconnect the breather tube
- Remove jack stands, lower jeep back on wheels
- Tighten up all CA bolt to specs
- Tighten track bar bolt to specs
- Check all bolts once again
- Center the steering wheel if needed
Rear removal:
- Set transfer case to Neutral and release parking brake
- Jack up the jeep, support for the frame with two 6t stands right behind the rear lower control arms brackets and for the axle with 3t stands. Wheels should be off the ground
- Remove eight 8mm driveshaft bolts. It might be useful to mark their position, so it'll be easier to put them back
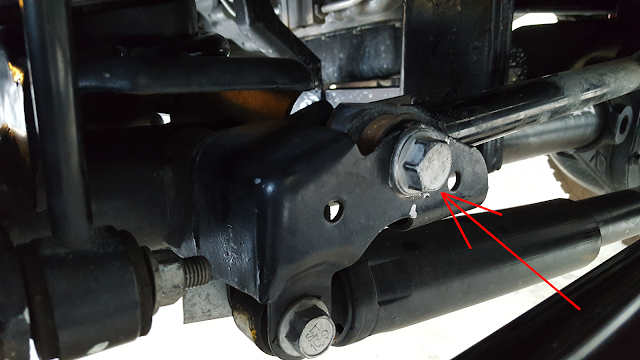
- Tap on the sides of driveshaft mount with mallet to break it loose. There are two punch holes on the back of the yoke mount as well - you may also use punch to disconnect the shaft end from the yoke if tapping is not enough
![Image]()
- Disconnect the driveshaft and hang it with big zip tie.
- Disconnect the breather tube from the axle
- Remove the wheels
- Disconnect the parking brake cable from each side.
- Disconnect ABS sensors cable from each side. Pull the red tab out and then press on the top of connector
- Remove shocks (two 16 mm bolts at the top, 18mm bolt and nut at the bottom)
- Disconnect sway bar links (bottom only, 18mm bolt and nut) and move sway bar up out of the way; secure it to the frame with zip ties
- Remove brake calipers and hang them to a sway bar with zip ties (two 18mm bolts each)
- Remove lower track bar bolt (21mm)
- Lower the axle until it rests on the dollies (springs should just fall out, followed by rubber spring isolators)
- Remove two upper CA bolts; disconnect CAs (18mm)
- Remove two lower CA bolts; disconnect CAs (21mm)
![Image]()
- Roll the axle out


Rear Install:
- Position axle on the dollies so the diff yoke is slightly upwards and roll axle under the jeep. Its a little harder with the rear axle because lower CA mounts stick straight down. Roll the axle under the jeep
![Image]()
- Connect lower CAs. Line up the holes and insert the bolts.
- Most likely you'll find that axle is too horizontal to connect the upper CAs. Put some wood blocks on the jack and jack up from under the yoke - this will rotate the axle slightly
![Image]()
- Now upper CAs should go right in their places. Line up the holes and insert the bolt.
- With all CA bolts in - put the nuts back on and tighten them slightly. Do not tighten them to specs yet - just give them a good spin so they set in place firmly.
- Jack the axle up.
- Reinstall the springs with isolators. This is a bit tricky part where someone's help is really useful. You need to jack it up just to a point when there is still enough room to insert the springs, yet axle is high enough so springs won't fall out.
- With springs in place - support axle with jack stands
- Reinstall the brake calipers
- Reconnect the swaybar links
- Reinstall shocks
- Reconnect the parking brake cable
- Reconnect the ABS cable
- Jack the axle up until the trackbar hole lines up with its mount, insert the bolt and nut. do not tight them to specs yet. Alternatively, you may line it up when lowering you jeep back to the ground. Anyway, there is a certain point when those two are lined up.
- Put the wheels back on
- Reinstall the driveshaft. There is not much torque on those bolts.
- Reconnect the breather tube.
- Remove all stands and put the jeep back on wheels
- Tighten up all CA bolts to specs
- Tighten track bar bolt to specs
- Check all bolts one more time
- Recalibrate you computer for a new gear ratio


Obviously, some of those steps can be done in different order. You may install brake calipers after installing the shocks or connect ABS cable before the parking brake, it really doesn't matter.
You may connect driveshaft before installing the wheels, but I'm a bit of a work safety freak and just don't feel comfortable crawling under the jeep with wheels off.
Here's the final result:

Everything worked out fine - Jeep drives straight, only needed a minor adjustments for the steering wheel centering.
Going from 3.21 to 3.73 feels absolutely awesome!
I also swapped my soft 14/56 springs for 18/58 and got ~1.5 inches lift front and rear.
Looking forward to doing a locker wiring soon.
P.S. For the record - two the most frustrating steps in the whole process:
- Disconnecting the ABS sensor cable for the front wheels. Took me about half an hour to figure the damn thing out. Tip #1: don't try to disconnect it right behind the shock, pry it off first. Tip#2: Rear connectors are the same and they're not hidden, practice on them first.
- Disconnecting the drag link. At first I was going to remove it from the pitman arm, but didn't think it is also pressed in, not just bolted.
Then I quickly realized that its not gonna happen easily, so I drove to a local HF and got a puller. With puller it all became a 3 minutes task (although puller can be used only on a knuckle side of a drag link, there is not enough room to use it on a pitman arm).
")