Jeep Wrangler Forum banner

Alpine Halo9 ILX-F309 Install then Review

49K views 53 replies 22 participants last post by  culvi  
#1 ·
Hello all,
Been using the forum for around 2.5 years and I must say this community is awesome. I did a ton of research on this forum prior to buying my 2015 Unlimited Sport 4-door. “Love my jeep”, is an understatement. No major upgrades but a lot of the smaller tips/tricks have been incorporated from forum posts.

On Tuesday I ordered the Alpine Halo9 iLX-F309 and it shipped on Wednesday, arrived on Thursday. I will provide updates and reviews as I install and use it.

Some background info:

I upgraded the jeeps stock speakers last summer and used collected input from forum members for the upgrade and how to do it successfully. I have the non-alpine, non-navigation radio with U-connect and hard drive currently. (430RBZ I believe)

For the current unit, lets suffice to say; I am not a fan of the u-connect system, voice controls, overly chatty announcements, half-broke Bluetooth integration, inability to work directly from a wired iPhone, ho-hum looks, slow screens, horrible radio pickup, weak power…etc.

On to the new!

The Alpine F309 unit is a floating style. Might not be everyone’s cup-o-tea, but I am willing to try it. I also know it is not CarPlay wireless like the Alpine 107. Some good videos online if you wish to check it out. I admit, I expect to like it due to the 9” screen, the price vs the 9” re-style systems, CarPlay, better Bluetooth integration and the vehicle information displays.

I plan to review.

Looks, function, install (summarized), sound/power, CarPlay, Bluetooth capabilities, vehicle info and whatever else seems fun.

One item I intend to try and have been researching is how to get more apps available on CarPlay. Specifically I intend to find a way to install Google maps. (there are ways – just check Google) The technical challenge makes the geek inside me grin.

I have already viewed some other Alpine installs and realize a few things to keep in mind.
*GPS function and accuracy should be verified and confirmed – some Alpine installs have poor GPS location abilities.
*Being sure to unpair current phones before the new receiver is installed
*Some reported issues with the install of similar units having a challenge with not hearing voice guidance due to speaker selection options.

OK, that’s it for now. Just un-boxed the device, will configure the maestro tonight then begin install on Saturday.

 
#2 ·
Quick update - A forum person asked how I knew it would fit as a popular website says it does not fit. Honestly, I don't. I am hoping it will. Got a couple days off, willing to give it a try and have some very modest 'tinker' ability that I likely put too much credit into.

Whats that saying 'fools go where wise men fear to tread'. Might end up being prophetic. :)
 
#6 ·
Whew, what a day.
As promised, here are some install highlights.
Used a knock-off Metra 95-6511 dash kit. Worked. Felt a bit flimsy being installed, but the end result was solid enough. I had thought about buying a Schosche unit, but after doing this I will not for reasons below.

A few install notes:
• Overall, I watched the Alpine 207-WRA install via Youtube. While this is a different unit and a few of the wires/connections might have a different piece or two, it was straight forward.
• I followed the Alpine 207 video install for routing wires, placement of the GPS, how to unsnap and get into compartments.
• I had the non-alpine, non-amplified model – I simply removed the lower control unit below the AC controls.
• I had the vendor do the wiring connections for me between the harness and the maestro units and prep’d for Wrangler install. Glad I did, professional job on a bunch of wires.
• FWIW - Typical CH1 kit worked fine. Maestro flashed and customized my steering wheel controls. Flipped volume to the side I prefer. Picked up the usual assortment of antenna, GPS, Sirius radio…etc.
• Install, for me – took about 6 hours. 3 of which were TOTALLY my fault.

Here is a rundown. Pay attention now and count the mistakes.
*The unit will NOT power up until you put on the ‘power cover thingie’. That is one of the last steps in the manual and I had thought I did enough to do a system test. Ugh – Just read the directions. I did not – wasted 1 hour uninstalling and checking connections as I didn’t know why the display would not power up. The power-cover looks cosmetic, it is not. Reinstalled….

*The unit will NOT go into setup until you apply the parking brake. Had to mess with parking brake twice on one occasion. I did not, again, read the directions, wasted 1.5 hours uninstalling AGAIN and finally using Google to figure out I should read the manual! Ugh 2x

*OK – For my 3rd and FINAL uninstall/reinstall I could not figure out why the AUX cord would not work. After pulling unit and checking connections AGAIN, Found some very, odd notes from the Maestro forums that says it is an issue that Alpine has not addressed. So – Aux cord is out. Ah well, iPhone cord and Bluetooth work fine.

Other notes:
*There are 2 ‘depths’ you can utilize. One of the benefits of my 3rd uninstall/reinstall is that I had tried the depth and found I preferred the ‘tight’ version. Which means you slide the depth adjustment ‘in’ from what the factor ships. Keeps it tighter to the dash, still floats, but doesn’t feel like it is hanging out too much.

*It is much more powerful than the stock unit. No surprise there, but for me I am finally putting some power into those new speakers and it sounds great.

*Obviously, this install is different as the unit has the floating head. I highly suggest a magnetic Phillips screwdriver. Didn’t use one to being with and there are a number of screws to apply vertically. Usual installs are most on the horizontal, but this unit has adjustments above and below the screen connector. Dropped a couple screws in the black carpet, spent 10 minutes looking…sigh

*Unless I missed it somewhere, there is only 1 USB input. If you wish to use the one in the console – Get the Alpine adapter as, in the 2015, it is a MINI-USB that connects to the lower u-connect unit below the AC unit. I didn’t get that adapter, so I made small ‘adjustment’ near the plastic in front of the shifter and brought my USB cable up there for connection in the cabin. I like that better anyway.

FUNCTTION
*Screen is fast, touch is really good. Responsive.
*Bluetooth sync is sweet. Call quality great. Bluetooth music, switching songs, skipping…etc – very fast.
*CarPlay – Meh – OK – I want my google maps – That is another day (soon) and another project. 😊
*Apple Maps – GPS accuracy – Solid
*Unit runs a bit hot. Blows some hot air out the ‘front’ of the housing that is mostly covered by the screen. As I mentioned about, I am going to keep the double-din mount brackets, even though they leave a bit of a gap I can see if I put my head up by the steering wheel. Otherwise a single-din, with larger bezels would keep that heat inside.
*Screen – Big and beautiful!
 
#8 ·
OK - Just a couple thoughts as I looked at the posted pictures.
1 - The screen is good quality. WXGA with good definition. Those pictures are not doing it justice.
2 - Again, the pic's do not capture the floating aspect at all. Not sure, might do a video in sunlight tomorrow. I really like the look in person, more so than these flat pictures.
 
#11 ·
Bigrant - I wold say it is possible but I would suggest a new bracket to help out with that. (not sure where that might come from)

I used the stock rear bracket, so the single din unit 'sits' on the brackets that the Jeep 430 sat upon. While it doesn't take the vertical space the 430 occupied, resting on the bracket does provide stability. Not sure how you would support it, but what you ask is theoretically possible given the adjustments the screen also provides to move up/down like a TV on a wall-mount.

Due to support concerns, I wanted it stabilized, I choose to mount it low and make use of the dash tray rather than a open area underneath. As I also explained in my note, glad I did due to the heat this generates too.

NOTE - I have a Rugged Ridge multi-mount which went right back in and bolted to the rear bracket with the bolt down from the tray, into the bracket, like it worked with the stock unit.

Bill
 
#13 ·
Awesome write-up Bill! I had my eye on this unit as well when it was announced as the aesthetics of the Re-Style version haven't grown on me yet, plus the cost. This looks really good in the JK actually.

Would love to see more pics if you get a chance, maybe in some daylight to get a better idea how far out is sticks. Seems pretty tight though.

I'm sure you saved some folks headaches installing also in the future.

Nice Work!
 
#39 ·
Greg does Apple Car Play work with the USB adapter reusing the factory plug in the center console? Tech support at Crutchfield advised I not even try that option as Car Play gets buggy when adapters are introduced into the circuit. What say you?
 
#16 ·
Sorry I have not done the review portion of this thread.
With my wife out of town on business, my high school daughter has appropriated the jeep for the week and I have not driven it since Sunday. So, installed the unit late Saturday, played in the garage a bit, drove to the grocery store on Sunday and that is it. UGH -
I will get it back next week and do the best review I can. Hopefully @gregbj33 has luck with his install and can give some user feedback.

My daughter does report the stereo is much more loud than the stock unit and friends at school said 'nice' to the looks. So, aesthetically we have the approval of some NC high school students. :)

Peace
 
#19 ·
Update on CarPlay - my .02 cents worth

Spent a couple quality hours with CarPlay on this device last night. Here are my thoughts on a few areas. Again, these are my thoughts and impressions. Your mileage will vary.

CarPlay on the Alpine
Running CarPlay on teh Halo 9, connected to 6sPlus running 11.2.6 (current firmware as of this post)
Still ambivalent on CarPlay. Most everything works without CarPlay. * * Bluetooth audio is great and works for all apps.
*Siri works without running CarPlay (although it does know you are connected to a Car and has some limits)
*The phone, contacts, voicemail...etc all work fine.
* podcasts/audiobooks work over bluetooth audio
THUS - what is left is really text message (hands free – read/compose) and then of course Apple Maps.

Personally, I don’t mess with text messages while driving.

Unfortunately, after a number of times being stranded or mis-directed, Apple Maps and I had a nasty divorce and we will not reconcile. She didn't like the words I used, I didn't like being told "Park the car and be prepared to walk 2 miles when a REAL map app got me there in 3 minutes to the front-door"

Summary: - Again, this is a personal item, CarPlay is not useful.

Google Maps on CarPlay
Well, fail on my part. The only known way to ‘mirror’ Google Maps on Carplay is NGXPlay. NGXPlay is ONLY available via jailbreaking. I tried the Tutu app and App Valley. Both ‘direct load’ apps allowing access to non-apple sanctioned apps, but NGXPlay is not available.
Further, since I cannot, for business and security reasons jailbreak my phone, I truly can not load NGXPlay.
Note I said ‘mirror’ because even if I did run NGXPlay, it only mirrors the app and does not allow keyboard input, so minimal support.

Alternative display: I did buy the Apple Lightening Digital AV Adapter. I connected that to the HDMI port I ran into my glove-box. I can use my Apple Device to show videos or display the phone information on-screen. (when parked with parking brake engaged – which can be bypassed but that is another story) Using that device, I did display Google Maps to the screen. Small comfort there as it just mirrors what is on my phone and I mount my phone ‘over’ the unit so its simply redundant. (for me)
Also – You would have to use the phone to touch, type…etc.
Summary: It was ‘interesting’ but not useful if the touch screen is not working on the large Alpine display.

Where to next? – I deemed Apple CarPlay not useful. I simply use Bluetooth audio for most all items on my phone. Heck, I can even get the Google Assistant to work by starting out and initializing it on the phone and then letting it play over the Bluetooth audio.
My wife and I are getting new phones this spring, and I will likely ditch the Apple iPhone. It has been 10+ years with Apple phones and I am sooo glad Apple turned the mobile world upside down. However, I was very close to switching before this and this just seals the deal. Sure, Android has its own limitations and Google is just another ‘big brother’ -vs- Apple; but I see no way in the future Apple will allow Google Maps on CarPlay and for me, and my personal situation, that is kind of it.
Summary: I will jump ship to the Pixel 2 and use Android Auto to get my maps fix only because everything else I would use is available via bluetooth audio.
 
#20 ·
Installed mine on Yesterday morning. I had to wire up everything as. Didn’t pay the extra money to have it pre-wired. That itself including programming the module and finding the wiring diagram took roughly 2 hours. Not bad as I enjoy doing that stuff.

I used a metra single din mounting kit which I liked, however, mine does stick out a little more than Bill’s, so I may look around for another single din option or may just use the double din side pieces kit. Would prefer a lower profile. Running antenna, mic, plugging everything together, tucking wires(took a little patience here, another reason to look for another mounting kit for more space) and mounting it took maybe an hour.

Once everything was together, turned the key and everything fired up and worked perfectly. HD radio reception is excellent, when I installed a pioneer in my 14 Ram 1500, radio reception was terrible in my area, so this is a huge plus for me. I didn’t install Sirius as of now, will use radio and my iPhone X for my music. I have used Car Play in the past and that along with the huge screen was why I made the choice. Bluetooth is super clear on both my side and my caller’s side, and I have a soft top. I also am a huge Pandora guy and like the Pandora stand alone interface even more than Car Play version. I have the alpine premium speakers/amp, and messed around with all the EQ settings and think very few adjustments can be made. However, sound is awesome! Volume level 9/10 is equal to 29/30 on the 430. If anyone has any suggestions/info on if I can dial in the sound adjustments please let me know, right now I have all 10 bands on eq set to 14, doesn’t seem like the dual eq or crossover settings changes anything. I did notice fader does work. Overall, I really like this unit.


Sent from my iPhone using Tapatalk
 
#22 ·
Installed mine on Yesterday morning. I had to wire up everything as. Didn’t pay the extra money to have it pre-wired. That itself including programming the module and finding the wiring diagram took roughly 2 hours. Not bad as I enjoy doing that stuff.

I used a metra single din mounting kit which I liked, however, mine does stick out a little more than Bill’s, so I may look around for another single din option or may just use the double din side pieces kit. Would prefer a lower profile. Running antenna, mic, plugging everything together, tucking wires(took a little patience here, another reason to look for another mounting kit for more space) and mounting it took maybe an hour.

Once everything was together, turned the key and everything fired up and worked perfectly. HD radio reception is excellent, when I installed a pioneer in my 14 Ram 1500, radio reception was terrible in my area, so this is a huge plus for me. I didn’t install Sirius as of now, will use radio and my iPhone X for my music. I have used Car Play in the past and that along with the huge screen was why I made the choice. Bluetooth is super clear on both my side and my caller’s side, and I have a soft top. I also am a huge Pandora guy and like the Pandora stand alone interface even more than Car Play version. I have the alpine premium speakers/amp, and messed around with all the EQ settings and think very few adjustments can be made. However, sound is awesome! Volume level 9/10 is equal to 29/30 on the 430. If anyone has any suggestions/info on if I can dial in the sound adjustments please let me know, right now I have all 10 bands on eq set to 14, doesn’t seem like the dual eq or crossover settings changes anything. I did notice fader does work. Overall, I really like this unit.


Sent from my iPhone using Tapatalk
Have you tried Alpine's TuneIt smartphone app?

https://play.google.com/store/apps/details?id=jp.co.alpine.apn.iw.fy2012.SmartFitApp&hl=en

https://itunes.apple.com/us/app/alpine-tuneit-app/id588431217?mt=8

^^ depending on your chosen platform

According to Crutchfield (but not mentioned in online materials by Alpine), the Halo9 ILX-F309 is supposedly compatible with the TuneIt app, which should allow a greater degree of control over the signal (but not while driving).

https://www.crutchfield.com/S-FcrEQ6V9ISO/p_500ILXF309/Alpine-Halo9-iLX-F309.html
 
#24 ·
@gregbj33 - GREAT
1 comment and a few question -
Concerning the depth - did you adjust the main unit slide-rails for the display depth? I did and that made a world of difference in how tight the fit was to the dash opening. It stuck out too far before, then I used the slide adjustment on the main housing to pull it tight to the dash. When next I mounted the display it was tough due to the proximity to the dash but the final display depth felt 'right'.

Questions
1 - Did you put in the micro-bypass parking brake item? - Any hints when I do my update? Not great with the wiring portions. :)

2 - I also programmed my Maestro but it does not show a wrangler - rather a car - does yours show a wrangler? Perhaps I missed a step in the Maestro setup?

3 - Any thoughts about a camera? I don't have one yet, but considering it when I crack the dash open again to add the parking brake bypass, might as well add the camera. Like some of the ones in the spare tire.

One last thought - I thought I had also detected an improvement in radio reception, but I was unsure. Your comments helped confirm my belief that this unit has better signal processing or whatever for radio pick up. Agree, the HD-Radio sounds awesome.
 
#25 ·
@gregbj33 - GREAT

1 comment and a few question -

Concerning the depth - did you adjust the main unit slide-rails for the display depth? I did and that made a world of difference in how tight the fit was to the dash opening. It stuck out too far before, then I used the slide adjustment on the main housing to pull it tight to the dash. When next I mounted the display it was tough due to the proximity to the dash but the final display depth felt 'right'.


Questions

1 - Did you put in the micro-bypass parking brake item? - Any hints when I do my update? Not great with the wiring portions. :)


2 - I also programmed my Maestro but it does not show a wrangler - rather a car - does yours show a wrangler? Perhaps I missed a step in the Maestro setup?


3 - Any thoughts about a camera? I don't have one yet, but considering it when I crack the dash open again to add the parking brake bypass, might as well add the camera. Like some of the ones in the spare tire.


One last thought - I thought I had also detected an improvement in radio reception, but I was unsure. Your comments helped confirm my belief that this unit has better signal processing or whatever for radio pick up. Agree, the HD-Radio sounds awesome.

Because of the fact I used a single din mount, the plastic piece that goes horizontally above and below the body prevents the back side of the monitor to reach with the adjustable piece pushed back. I assume you used the double din(2 side pieces only) mount, which gives the clearance to push your inward. Going to order it today.

1. Bypass is in, very easy, I ordered the 4 wire one as I says was Alpine compatible, but on this unit only needed 3 wires, black splices into the other black(ground) wires in the harness, blue one goes to the remote turn on wires(blue with white stripe) in the harness. The last wire was a yellow and blue wire(parking brake wire) goes to same color wire coming out of the alpine wires, and cannot be wired into the harness, if the wire is wired into the harness, since you had yours pre-wired, it needs to be disconnected from the harness. Hope that makes sense, and the last wire(if you get the 4 wire, it will be yellow and black), doesn’t get connected as there is no hand brake wire coming out of the alpine wires.

2.mine also just shows a car. Not sure that changes, but maybe other people can chime in. Also any info on changing the startup screen to Jeep one is welcomed.

3.will probably do a camera at some point but gonna wait on a little extra cash flow for that. Seems straight forward to install and a few god videos on YouTube to help.

Yes, radio reception much improved even over stock 430.


Sent from my iPhone using Tapatalk
 
#26 ·
Well finally some pics. I re installed using the double din mount. To get the correct height for the body part of the radio I had to drill new holes on the mount pieces to align with the holes in the side of the body. Also, to avoid trimming any plastic on the dash of the Jeep, I cut away a section just behind the trim pieces so it would fit under the plastic strip going across the top of the opening in the dash. After that it was smooth sailing, and the space between is so much better, much lower of a profile.
Image


Sent from my iPhone using Tapatalk
 
#28 ·
Had a couple questions from someone who purchased an install.

Can you make the center console USB work?
Yes, with proper connector. I chose to bring mine out near shifter however.

Do the steering controls work?
Yes, just takes Maestro programming. Even remapped buttons to my liking.

Sounds like perhaps the installer was not well informed of experienced.
 
#29 ·
My Alpine Halo9 ILX-F309 Install

WARNING: RIDICULOUSLY LONG AND DETAILED THREAD:

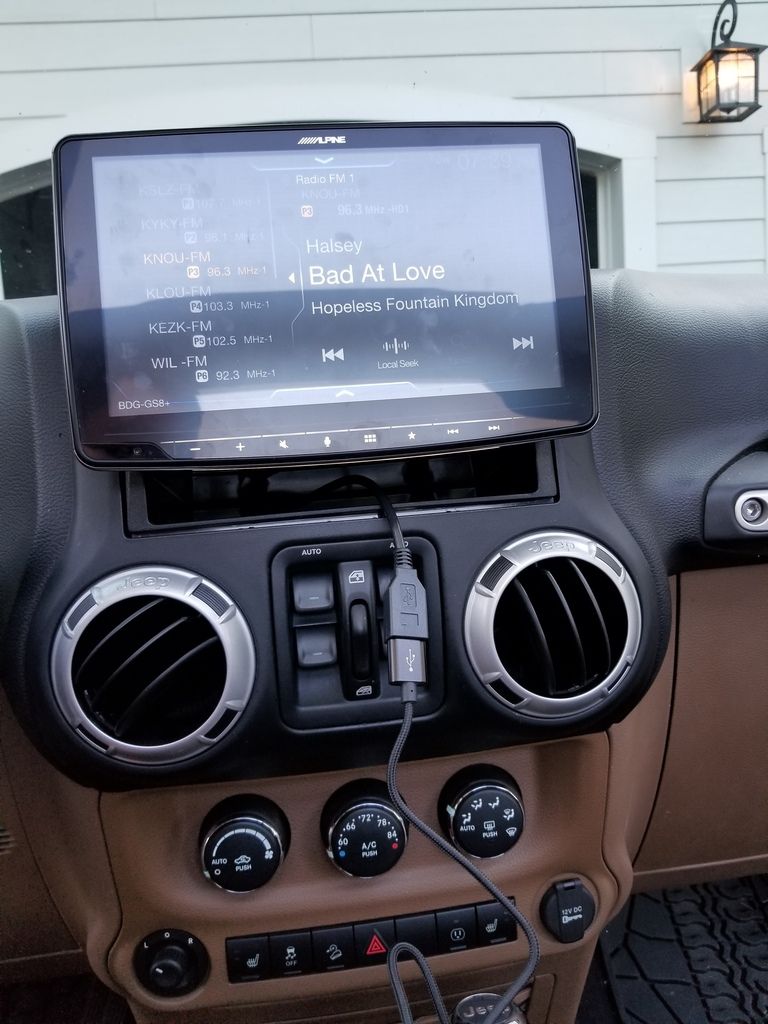
With full credit and inspiration to 1WildBill, I also installed the Alpine Halo9 ILX-F309 in my 2013 JKU – I am very happy with the result!!!! Like 1WildBill, I have used this forum for quite some time, but have never posted. Also, with my install, I did a few things different than 1WildBill and will note those things here for others.

I had the Jeep unit with NAV and the CD player under the screen. The unit functioned fine, but was slow and not very engaging – just a mediocre factory unit which should have been much better given the cost of the thing when I bought the Jeep. It is also worth noting when I got the Jeep in 2013, I installed a MyGig LockPick Pro device and camera. The LockPick went out recently which meant the rearview camera no longer functioned (in fact my factory stereo/nav stopped functioning until I bypassed the broken LockPick). Therefore, my sole motivation for doing this project was because my youngest kid becomes a driver in December and I needed the camera to be fully functioning again (spend $300 bucks on another LockPick just to get the camera working again or upgrade all sound and most other tech in the JKU for . . . well . . . a bit more money).

Like 1WildBill (and based on his recommendation), I based much of my install on the Alpine 207 video install (for routing wires, placement of the GPS antenna, placement/routing of the new microphone, how to unsnap and get into some of the compartments, etc.). The excellent video is here:


http://www.youtube.com/watch?v=NxIjXJeRn08.


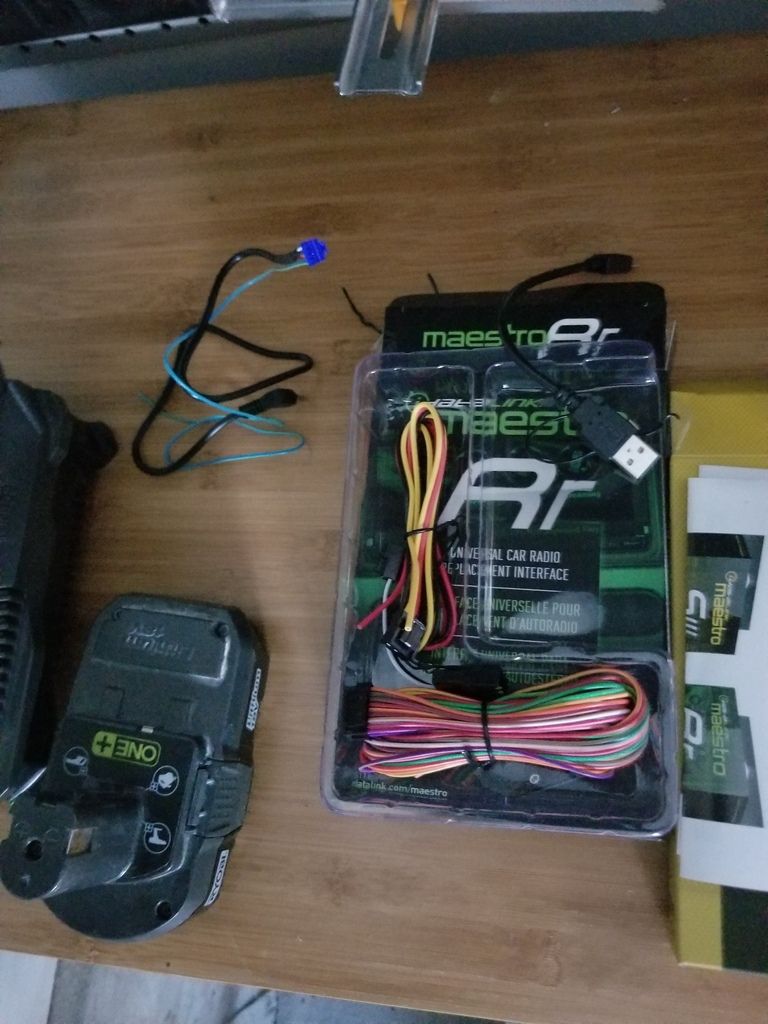
I purchased from ABT (with a nice $100 Memorial Day discount) (1) the Halo9 and (2) the iDat-aLink Maestro RR Universal Radio Replacement and Steering Wheel Interface. I picked up from Amazon/BestBuy/Home Depot the following:
1. Maestro - Plug-and-Play Installation Harness for Select Vehicles – HRN-RR-CH1
2. Metra - Antenna Cable Adapter - 40-EU10
3. Metra 99-6511bb Chrysler Dodge Jeep 07 Up Installation Kit
4. 3/4 in. x 10 ft. Galvanized Steel Hanger Strap (https://www.homedepot.com/p/Oatey-3-4-in-x-10-ft-Galvanized-Steel-Hanger-Strap-339232/100167964) (for security of the unit – which I explain later)

A couple of things to note – you do not need the Maestro Rear-Seat Video Harness (either the video for the Alpine 207 install or something else I read says you need it for the rearview camera, but you do not need it for the Halo9 install with camera). Also, the video says to connect the satellite antenna during the install. I did not do this as I have no intention of getting sat radio now that I can stream with ease. Also note, the Metra Install Kit has a great slot underneath through which I routed the USB cord and it serves as a great place for my phone to sit after I plug it in. As with almost any project I tackle, I followed the following process (just my $.02):

1. Read through all the install instructions first. If you are really good, it may save you mistakes as you go. If, on the other hand, you are like me, you will still make mistakes, but having read ahead will help you diagnose and correct your mistakes. Unfortunately, reading ahead is only so useful because some instructions make no sense until you actually get into the project and by then, you don’t recall what you read. When you make your mistakes, some of the stuff that did not make sense during your pre-install read may click and you will have your aha moment of, “oh, that is what they meant.”

2. Decompress. After reading the instructions ahead of time, put the instructions away for a bit and then commence your project in stages. Looking at all the wiring at once can be a bit overwhelming. Following the manual page-by-page without going too far ahead will make the project more manageable. It is much easier to bite off a project like this one-step-at-a-time. Just a thought – use my instructions below as a checklist. Read it ahead of time, but then check off each paragraph as you go – this will help keep the project manageable.

3. Be patient with yourself as mistakes will happen. You will drop a screw here or there, you will mis-wire something or forget to make a connection, or something else that I can’t even imagine may occur. There really is nothing too serious that can’t be fixed with a little patience and determination.

4. Take advice from others! Reading 1WildBill’s install instructions and mistakes saved me some heartache – something like installing the cosmetic-looking “power cover thingy” in order for the unit to work is easy to overlook and knowing this ahead of time certainly saved me some aggravation. I read 1WildBill’s instructions probably half a dozen times. Reading his instructions and then reading my instructions thoroughly to understand my self-inflicted errors may save you the same fate. I am sure at some point, the advice given in this thread will allow someone to accomplish the much sought-after perfect install.

Now, on to the install (do this at your own risk – I accept no responsibility for any errors you might make based on these instructions or otherwise):

1. Unbox everything and leave all cords near the boxes they shipped with. You will not be using all the cords that came with the Maestro.

2. Unpair all phones from the factory unit (not sure if this is necessary, but why take the chance).

3. Disconnect the negative battery terminal (this will prevent accidental shorting of components – probably not necessary because all of the cutting and soldering is done at the bench and the only thing done in the dash is plugging and unplugging harnesses, but again, why take the chance).

4. Remove the Dash (see the Alpine 207 install video): start by pulling out the window control switches and disconnect the harness by sliding the red slider up and then unplug the harness and place the controller aside.

5. Remove the kick panel below the steering wheel just by pulling and place aside. There is one screw below where the window control switches sat and another two that were hidden by the kick panel you just removed. Unscrew all three screws and set aside. There may be one more screw under the storage tray mat on the top of the dash. Remove the rubber storage tray mat to access the screw and then remove that screw as well and set aside (I already had moved that screw and had modified my rear stereo bracket when I originally installed the LockPick device several years ago). Remove the dash in accordance with the Alpine 207 video (once the screws are removed, you just yank and pull the dash and it will come off) and set aside.

6. There are four screws that hold the factory stereo unit into the dash – remove those four screws and set aside.

7. You should now be able to pull out the factory unit and unplug the harnesses and antenna cable. Set the factory unit far out of the way (good riddance).

8. Get your Metra Install Kit and drill or clip out from the back of the Metra Storage tray enough material to feed the USB cord through. (I routed the Aux and the HDMI cord into the glove box, but you could also remove additional material from the Metra storage tray and route those cords through the tray as well – that just seemed to me like a lot of wires, that will rarely if ever get used, sticking out of the dash).

9. IF YOU WANT TO SECURE YOUR UNIT AGAINST THEFT: cut or bend 2 pieces of approximately about 12 to 15 inches of hanger strap (err on the side of longer, you can always trim this down the road). On the bottom of the Halo9, there are three screw near the front of the unit. Remove the two outside screws. Mount the two pieces of hanger strap to the bottom of the unit using the two screws you just removed and aim the hanger straps toward the back of the Halo9. Then manipulate the two straps until they cross with one another near the back of the Halo9. (During my install, I did this step much later because I did not like the lack of security of the Halo9 – doing this step at this point will save you much aggravation down the road!)

10. Mount the new Metra Install Kit – you use only the two single din mounting brackets (you can discard the double-din brackets if they came with the kit) which get attached to the sides of the Halo9 with two screws on each side (I do not remember the screw positions, but it is fairly obvious). The screws are included with the Halo9. The two mounting brackets are aimed toward the front of the Halo9 and they cover the side edges of the front of the Halo9. Install the Metra kit into the dash using the four screws you removed when you took out the factory unit from the dash (Step 6, above).

11. At this point, you need to decide if you want the Halo9 to sit tight against the dash or a bit further out. I strongly preferred the tight fit. The Halo9 instructions explain how to adjust the depth. There are only four screw to deal with, but make sure you are using a magnetic screwdriver or that you are at your bench for this step. (I dropped a screw in the car and wasted 15 minutes hunting for it.)

12. Place the Metra faceplate around the Halo9. This must be done at this point – before you attach the Halo9 screen as you will not be able to get the Metra faceplate on after this stage without first removing the Halo9 screen from the base unit.

13. Next, install the Halo9 screen to the base unit. This is done with four screws provide with the Halo9.

14. Install the power cover thingy/power-cover (which is not just cosmetic – as the Halo9 instructions and 1WildBill noted, the unit will not power up without it) that was included with the Halo9 using the single screw provided.

15. You have already adjusted the depth of the unit (Step 11), but now is a good time to adjust the height and angle of the screen (without having all the wiring and the Maestro in the way). You can perform this step by sliding the unit into the Metra kit which you previously installed in the dash. See the Halo9 instructions included with the Halo9 to adjust the height and angle to your preference.

16. Following the Alpine 207 install video, remove the HVAC controls and disconnect the factory uConnect system (if your jeep was so equipped) first by removing the left 7mm screw and then unplugging the two harnesses. (The video shows the installer connecting a USB extension cable at this point. If I recall correctly, I did NOT need to do this with the Halo9 because I did not use any of the factory uConnect going forward. Instead, I used the USB cord connected to the Halo9 to be able to plug-in my Android or Apple phone. I just unplug this USB cord and leave in the dash to avoid Bluetooth pairing confusion.)

17. Flash the Maestro and map your buttons by following the on-line Maestro instructions. Maestro makes this very easy as you get to pick your car and factory stereo system from a series of icons and pictures on the website. [Note: I am going from memory here and I believe the Maestro instructions say the serial number of the Halo9 will begin with one of two letters (I think it said an A or an S). I believe my unit began with an R. I entered an R (I believe) and then all the numbers appearing after the letter. To end all debate, the serial number you need in the proper format is actually stamped on the casing of the Halo9 as opposed to the longer number which appears on the Alpine sticker also on the top of the Halo9 chassis. Enter the proper letter (again, I think R) and then the number stamped on the casing (as opposed to the number of the sticker that is on the casing) and you should be good to go. I think the entire sequence is 9 characters. Also, in my options, I accepted or retained all the OEM systems except uConnect – I did not retain any of the uConnect functions.

18. Prepare the wiring harness – mating the Alpine Harness with the Maestro harness takes the most patience of any of the steps and requires you closely follow all the Maestro instructions!!! If you do not have soldering skills or the necessary tools, you can have a professional handle this (like 1WidBill did). The Maestro instructions are on-line and they include a very useful wiring diagram (picture). However, there are a couple additional pages after the wiring diagram that are essential to properly complete the wiring. I failed to read ahead here and had to install/uninstall the unit twice because of wiring mistakes. Again, make sure you read all the pages of the on-line Maestro instructions including those after the wiring diagram and you will save yourself much aggravation. Your wiring harness will be complete if you have used every wire other than the brown wire, the orange wire, and the red plug. Otherwise, every other wire gets used. Pay very close attention to the actual colors of the wires (I somehow confused a yellow/black with a yellow/blue at some point). Once you have soldered all the wires and separately electric taped or shrink-tubed each soldered wire, wrap all the wires together with electrical tape to make what looks like a somewhat factory harness. This will keep your install cleaner and easier to manage down the road. Note: there are a few long wires on the Alpine harnesses/plugs which can be cut in order to make them a more manageable length and to be more easily wrapped in with the other wires when you tape up your new harness. You are now a good chunk of the way there – most of the remaining install steps are simply plug and play.

19. Install the Maestro by plugging in all the appropriate harnesses/plugs (see Maestro instructions and follow them carefully), including the harness you completed in Step 17. Make sure you match the colors of the plugs properly as detailed in the Maestro instructions. I left my Maestro unit in the dash cavity wedged against the AC vent on the left side (it is wedged in their pretty tight and has not made any noise since I completed this project).

20. TEST IT: Go ahead and try to get as much of the dash wiring pulled up to and through the Metra install kit that you previously installed in the dash. Make all connections to the Halo9 (don’t forget to use the Metra antenna adapter, satellite adapter (if connecting the satellite radio), USB Cord, HDMI, AUX, new microphone, and all other harnesses/plugs). Most of the wires are properly labeled (i.e., mic, GPS antenna, camera, etc.). Reconnect your battery negative terminal under the hood and fire up the Jeep. If everything works, CONGRATS. If not, get ready to troubleshoot the wiring.

21. Once you get everything working, unplug all harnesses/plugs from the back of the Halo9 and remove it from the dash. VERY IMPORTANT: loosely place the dash back up on the dash board (otherwise, you will not be able to get the dash over the Halo9 screen to reattach the dash. Reconnect the Halo 9).

22. With the dash loosely attached, reconnect all harnesses/plugs into the back of the Halo9. Begin to slide the Halo9 into the Metra Install Kit. As you do so, reach through the window controller hole (or behind the loosely installed dash) and try to grab the hanger straps you installed in Step 9. Bend those two pieces downward around the Metra Install Kit tray and work the unit into the Metra Install Kit while continuing to pull the hanger straps downward. As you get the Halo9 close to the Metra Install Kit, make sure the tabs of the Metra faceplate are underneath the Metra Install Kit – those need to snap or lock into place. Continue to push the Halo9 into the Metra Install kit until you hear the face plate click in place.

23. You are almost done – however, the Halo9 can easily be removed at this stage just by tugging on the screen of the Halo9 (this gave me no theft prevention confidence). I came up with two good options to properly secure the Halo9 in the dash. Plan A: looking through the window control hole in the dash, you will see a 7mm screw toward the back of the cavity (I believe it holds the plastic HVAC vents in place). Unscrew this screw, move the two hanger straps toward each other until you can see through a single hole in the two hanger straps the hole from which you just removed the screw, and then reinstall the screw through the hanger straps and back into the hole in the Jeep. DO NOT GET OVERZEALOUS HERE – I did and I ended up twisting off the screw head which left that screw hole useless for me. Rather than drill out the rest of the screw, I moved on to Plan B: remember the screw you removed from the area immediately underneath the window controller in Step 5? Bend the hanger straps together, line them up so you can see that screw hole visible through the hanger straps, and insert the screw into the hanger straps and then CAREFULLY tighten the screw down to the screw hole in the Jeep dash. Your Halo9 will now be relatively secure inside the dash. If a thief wants to steal it, they will basically have to rip apart the dash. Button up the dash (see the Alpine 207 Install video).

24. NOTE: In order to get the Halo9 into the settings function, you may have to apply/reapply your parking break a time or two Otherwise, you are done – CONGRATS AND ENJOY! You have to get the camera (discussed in the next step) working by accessing the settings menu of the Halo9.

25. THE CAMERA (I am going memory as I did this back in 2013 when I got the Jeep). You will need to do this step BEFORE installing the Halo9 in order to connect the camera during the Halo9 install. Otherwise, you can add the camera later if you don’t mind uninstalling and reinstalling the Halo9.

a. I bought a Pyle camera which came with the proper-sized drill bit (https://www.amazon.com/Flush-Mount-...ilt/dp/B000MCKA5Q/ref=sr_1_8?ie=UTF8&qid=1528917469&sr=8-8&keywords=pyle+camera). I installed the camera in the center of my rear bumper. There is enough space to properly install the camera and to access the wires from underneath and behind the bumper. Looks pretty slick in my opinion.

b. I grabbed power for the camera by tying into the wiring for the reverse lights. This is pretty easily accessible in the jeep and I you should probably be able to google this). If you look at the kit, the red power cord with the red and black leads get tied into the reverse light wiring. You then simply plug that power supply into the red RCA attached to the camera. Plug the yellow RCA cable into the yellow RCA attached to the camera and wire to the dash. Again, pretty easy to do in a jeep and wire routing instructions are probably available on google if you cannot find a good path. Wrap all cords inside the plastic tubing (https://www.amazon.com/Black-Split-...r_1_1?s=electronics&ie=UTF8&qid=1528917715&sr=1-1&keywords=plastic+wiring+cover) and cover then wrap the plastic tubing with electrical tape to seal up the seam. Secure the plastic tubing to the underside of the Jeep with zip ties. Feed the yellow RCA cable up through the Metra Install Kit and you will be ready to connect the camera when you install the Halo9.

With all my errors (including searching for a dropped screw and correcting a couple mismatched soldering errors), install probably took a total of 6 hours. Part of this time was spent figuring out the Metra Install Kit and then uninstalling and engineering a solution to secure the Halo9 in the dash with the hanger straps (a call to Alpine Technical support only revealed that they declined/failed to manufacture the unit with a screw hole in the back of the unit that could be used to secure the unit into the dash). I also had to uninstall my LockPick and sort out the wiring after doing so (something most of you won’t have to contend with).

At the end of the day I AM VERY PLEASED WITH THE UNIT -- PERHAPS MY FAVORITE JEEP MOD TO DATE! It gave my 5 year old Jeep a thoroughly modern look and significantly enhanced electronics and sound. Although I have not replaced any speakers, the ability to receive HD radio and stream other digital radio has drastically changed the sound in the car. I use an Android and love Android auto – being able to use Waze and Google Maps is huge. My kids all use iPhone’s and they love having Apple CarPlay. Supposedly later this year, Apple is going to allow the use of third party mapping applications as part of Apple CarPlay. It is a shame Android Auto and Apple CarPlay require the phone to be plugged in – it would be much better if could be used via Bluetooth. However, at least the USB cable from the Halo9 charges the phone (which is probably why Android Auto and Apple CarPlay require the phone to be plugged in – so it can charge while using these functions). The ability to stream music whether via Bluetooth or Android Auto/Apple CarPlay is great – again, you do not have to be plugged in to stream music. Phone functions are much improved from the factory uConnect system. I love having Google Assistant available and my kids like having Siri available – both just at the push of the button on the steering wheel or on the front of the Halo9.

Good luck to all who attempt this project – the results are well worth the effort!


Image


Image


Image


Image


Image


Image


Image


Image


Image


Image


Image


Image