
My 2013 JKU just hit 104,000 miles and I wanted to do some maintenance work. I have already replaced the spark plugs and all fluids and filters. But I have not yet replaced the PCV valve. From what I can tell, it is on the passenger side of the engine near the back. Has anyone replaced is and how hard it is to get to?

Freedom JK

Anyone replace the PCV valve on the 3.6 engine?
1 reading
Freedom JK
Discussion starter
2,902 posts
·
Joined 2013
- Add to quote Only show this user
My 2013 JKU just hit 104,000 miles and I wanted to do some maintenance work. I have already replaced the spark plugs and all fluids and filters. But I have not yet replaced the PCV valve. From what I can tell, it is on the passenger side of the engine near the back. Has anyone replaced is and how hard it is to get to?
484 posts
·
Joined 2014
Freedom JK
Discussion starter
2,902 posts
·
Joined 2013
Thanks. It looks like it is going to be a pain to access.
484 posts
·
Joined 2014
Yeah, I am not looking forward to it either. I will say when that day comes, going straight with a OEM part and not an aftermarket.
4 posts
·
Joined 2022
Has anyone had trouble with any other pvc valve other than mopar? We replaced mine with some from autozone and it’s still leaking. Were wondering if mopar had any issues, thanks!
2 posts
·
Joined 2016
The only realistic way to do this is to take off the front passenger tire and remove the fender lining from behind it. (I had replaced my fender flares with Bushwhackers so that was pretty easy. This may be more difficult with stock or other fenders.)
The placement of the PCV valve on the engine is described in the link below. Disconnect the hose from the PCV, which may require some WD40 or something similar, and moving some small plastic tubing over. Once that is done, things should go quickly. From the exposed wheel well, I used a small socket wrench with a star 25 socket to get to the 2 bolts on the PCV. All this took about 30 min to do (really depends on how easily the hose comes off, how easily the fender liner comes off, and if the engine is cool to the touch.)
https://m.youtube.com/watch?v=mxwC5vVqidM
PS- the first time I tried this from the top it took close to 6 hours and no skin left on my knuckles. I never was able to get the bottom bolt tightened, so it leaked oil. I later realized there was a better way that no one had posted about. This awareness came when I was changing an O2 sensor. I had never appreciated an O2 sensor DTS light so much!
301 posts
·
Joined 2017
I was able to change mine from the top without going through the wheel well, but it was a pain. You definitely need a small (Torx if I remember right?) bit to have it fit. I used one of those very small wrenches on the bit and did it mostly by feel. Tools meant for accessing tight spaces will be your friend. Going through the wheel well sounds reasonable enough, especially if you're not using the stock fenders.
5 posts
·
Joined 2016
Can you tell me how you managed to get your tube off the PCV valve? What type of torx wrench did you use to access the bottom screw.
1,119 posts
·
Joined 2014
I just changed my pcv valve this past weekend. It was not fun, but i got it done from both behind the fender liner and also up top. (Top was harder for me)
My symptoms of a bad pcv. I was all of a sudden eating a bunch of oil after not ever eating any. I was also having detonation and had to move gas up to 89 to prevent it.
So far after pcv change the jeep has felt noticeably better. The engine is smoother and I will see on oil use after more mile. No use so far after 120 miles.
![]()
![]()
![]()
My symptoms of a bad pcv. I was all of a sudden eating a bunch of oil after not ever eating any. I was also having detonation and had to move gas up to 89 to prevent it.
So far after pcv change the jeep has felt noticeably better. The engine is smoother and I will see on oil use after more mile. No use so far after 120 miles.


7,443 posts
·
Joined 2012
What year and how many miles?I just changed my pcv valve this past weekend.
4,420 posts
·
Joined 2015
I changed mine over the weekend. I think it was weekend, being shut in I’m losing track of days. I did the hose and bottom bolt thru the wheel well. The lower bolt came out with a little flat ratchet tool and T25 bit. The hose was a pain due to vacuum line and wire harness running across it up top kind of holding it down. I coxed the hose off by running a small screw driver between the hose and the PCV and using a big flat blade screw driver to push it off. ( I have Mopar Hi-Top Flares and Ace Liners so removal of those were pretty easy.) The top bolt was a pain. There is a vacuum line that runs right on top of the PCV valve and got in the way as well as the trans fill tube. I ended up disconnecting the vacuum line to get it out of the way and unplugging a sensor that is on valve cover to be able to get to the top bolt. I used a 1/4” box end wrench with a T25 bit taped in place to turn it a little at a time.
Installing the PCV was also a pain as that vacuum line is in the path and you can’t see the hole where it goes.
Installing the PCV was also a pain as that vacuum line is in the path and you can’t see the hole where it goes.
1,119 posts
·
Joined 2014
Agreed, bottom bolt and hose off (loosened and pushed up and off with flat blade screw driver) through the removed fender area. The removal of the fender liner was easier for me as I run Nemesis fenders and it’s easy to remove the liners. To get the vacuum hose off, simply remove the push fastener holding the vacuum line located on the center of the valve cover. When you do that you can then slide the vacuum line to the side and off the top of the hose. Agreed, the top bolt sucked.
Update after 400 miles. Still no noticeable oil loss and the engine is much smoother and better performing.
Update after 400 miles. Still no noticeable oil loss and the engine is much smoother and better performing.
3,475 posts
·
Joined 2014
Hose is easy if you use a pick.
Top bolt requires an 8-year’s old girls’ hands.
Top bolt requires an 8-year’s old girls’ hands.
88 posts
·
Joined 2018
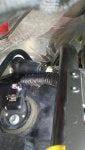
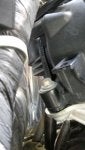
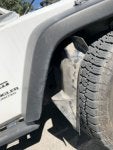
Replaced the pvc today on my 12 JK 3.6. Getting kick in the balls is nothing compared to doing this job. Used torx bit socket with 1/4 to 3/8 adapter with flex head 3/8 long handle ratchet to get top screw. For bottom screw used torx bit and 1/4 box wrench. Took off tire and fender liner and was easier that way. Also disconnected vac line and moved it to get rubber elbow off pvc. Used a cotter pin tool to pry elbow off. Took about 2 hours start to finish to get the job done. I hope this helps the next guy.
Attachments
-
 63 KB Views: 1,527
 -
 76.3 KB Views: 1,329
 -
 59.2 KB Views: 1,276
499 posts
·
Joined 2014
If anyone could share tips on how they got the top t25 bolt out? I've been at it for 2 hours and the trans fill line is getting in the way. This is one I should have taken to the shop.
Sent from my SM-G781W using Tapatalk
Sent from my SM-G781W using Tapatalk
499 posts
·
Joined 2014
Also I dropped the bottom bolt when it came out and now I can't find it for the life of me.
Sent from my SM-G781W using Tapatalk
Sent from my SM-G781W using Tapatalk
499 posts
·
Joined 2014
Omg this thing! I finally got it out and when trying to get the new one in I couldn't get the hose out of way. When trying to move it, it snapped. Backorderd for 7 days.
![Image]()
![Image]()
Sent from my SM-G781W using Tapatalk


Sent from my SM-G781W using Tapatalk
67 posts
·
Joined 2020
Sigh.
This is why I still have a replacement PCV in a box.
#pcvreplacementanxiety
This is why I still have a replacement PCV in a box.
#pcvreplacementanxiety
499 posts
·
Joined 2014
Wow what a fiasco that was
After a lost bolt, a broken hose that was back ordered for 7 days, I finally for the new pcv valve in with a new hose. I couldn't find the exact match of bolt so I used the same one with a button head socket which worked. I'll make a note for the next owner if I decide to trade it in for a JL. I hope the pcv valve is easier to get to on the JL!
![Image]()
![Image]()
![Image]()
Sent from my SM-G781W using Tapatalk
After a lost bolt, a broken hose that was back ordered for 7 days, I finally for the new pcv valve in with a new hose. I couldn't find the exact match of bolt so I used the same one with a button head socket which worked. I'll make a note for the next owner if I decide to trade it in for a JL. I hope the pcv valve is easier to get to on the JL!


Sent from my SM-G781W using Tapatalk
2,305 posts
·
Joined 2011
Whenever you replace the PCV valve, you need to unbolt the trans fill pipe from the transmission and from the bracket behind the engine. Two 10mm hex head bolts. Look where the fill pipe comes up out of the transmission. There will be a bolt nearby. Then follow that up to the area behind the engine. There's a bracket holding the fill pipe.
Once you do that, you can maneuver the transmission fill pipe out of the way. Don't worry. No transmission fluid will come out.
Once you do that, you can maneuver the transmission fill pipe out of the way. Don't worry. No transmission fluid will come out.
499 posts
·
Joined 2014
That would have made it so much easier.
Sent from my SM-G781W using Tapatalk
Sent from my SM-G781W using Tapatalk
10 posts
·
Joined 2021
I replaced my PCV last weekend on my 2012 JKU sport. I took pics from the POV of how I did it (some what). I went with the whole “through the fender” approach. As for the top: I didn’t mess with the trans dipstick tube at all. I just used a 1/4” drive swivel head ratchet. It’s all about how you approach the hardware. I was standing on my front bumper and I was able to get my fingers in and around the trans dipstick to turn the ratchet. Took me 30 mins. (I also have ogre hands.) If I can manage it, I believe you can too. Have patience! Hope this helps a little.
On another note: I remember reading in a forum somewhere that replacing the hose along with the PCV was “required”. Can anyone attest to this?
On another note: I remember reading in a forum somewhere that replacing the hose along with the PCV was “required”. Can anyone attest to this?
Attachments
-
 1.1 MB Views: 540
 -
 1.4 MB Views: 472
 -
 2.3 MB Views: 516
 -
 1.9 MB Views: 528
 -
 1.8 MB Views: 520
4,420 posts
·
Joined 2015
Ordered a similar swivel head driver for upcoming PCV on wife’s JKU. Hope it goes better than mine did.
2,305 posts
·
Joined 2011
The hose or tube is just a hollow hose/tube. You can simply spray degreaser inside, let it soak, then run a flexible pipe cleaner through it, wash it out with water, then let it dry, to make it as good as new. No need to replace it unless it is damaged.
10 posts
·
Joined 2021
Do you think I should do the same with the plenum? I noticed a good amount of oil going through it when I took it off to replace the bank 2 coils and plug. Or just stay a good amount of intake cleaner through it with it running.
19 posts
·
Joined 2017
I'll be changing the PCV on my 2012 JK this weekend. For those of you that have done this already, do you think this tool will be sufficient to remove the torx bolts holding the valve on? I have this tool already and have only used it to remove the transmission pan hold down claws to change the fluid and filter.
Also, is it possible to just remove the inner fender splash shield or just partially remove it to be able to reach in there and access the bottom bolt without having to take the whole flare off? I have the fender flare hardware kit including rivets in case there is no other option.
Also, is it possible to just remove the inner fender splash shield or just partially remove it to be able to reach in there and access the bottom bolt without having to take the whole flare off? I have the fender flare hardware kit including rivets in case there is no other option.
2,305 posts
·
Joined 2011
I reached both screws from the top. It's not comfortable, but it works. You can spread some padding over the grill and area where you will be leaning over.-snip=
Yes, that is the same tool I used (maybe different brand, but same design) and would recommend.
2 posts
·
Joined 2021
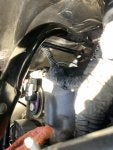
I know it might be a bit late. But I just replaced the PCV valve on my 2016 JKU and the easiest way that I found was to remove the battery tray. The battery tray only takes about 20 minutes to remove (just watch the genesis dual battery video on YouTube; that video shows you how to remove it). Once you remove the battery tray, you can access both the upper and lower PCV valve bolts from the top of the engine. You will need a small gear wrench that holds a 1/4” drive T25 Torx bit (as others have mentioned); I picked mine up at O’Rielly’s for about $8. I also used a 1’ length of paracord wrapped around the hose as leverage to remove the hose from the PCV valve easier (just pull straight up and it’ll pop right off). All in all, it took me about an hour and a half to change it out and get everything back together. I’ve attached a picture that shows how much access you have to the PCV valve with the battery tray removed. Hope this helps.
![Image]()
Here you can see how much access removing the battery tray gives you to the PCV valve.
![Image]()
And here it is all put back together.
Here you can see how much access removing the battery tray gives you to the PCV valve.
And here it is all put back together.
4,420 posts
·
Joined 2015
Does the tray come out as a stand alone piece? I thought it connected to the fuse box etc. No?I know it might be a bit late. But I just replaced the PCV valve on my 2016 JKU and the easiest way that I found was to remove the battery tray. The battery tray only takes about 20 minutes to remove (just watch the genesis dual battery video on YouTube; that video shows you how to remove it). Once you remove the battery tray, you can access both the upper and lower PCV valve bolts from the top of the engine. You will need a small gear wrench that holds a 1/4” drive T25 Torx bit (as others have mentioned); I picked mine up at O’Rielly’s for about $8. I also used a 1’ length of paracord wrapped around the hose as leverage to remove the hose from the PCV valve easier (just pull straight up and it’ll pop right off). All in all, it took me about an hour and a half to change it out and get everything back together. I’ve attached a picture that shows how much access you have to the PCV valve with the battery tray removed. Hope this helps.
View attachment 4519946
Here you can see how much access removing the battery tray gives you to the PCV valve.
View attachment 4519953
And here it is all put back together.
4,420 posts
·
Joined 2015
PCV Replacement Tool Kit
Replaced the PCV Valve on my wife's '16 today. Thanks to all who posted tools to use. Last time I did one, my '15 (Spring 2020-ish), it took several hours. This time it took a bit less than an hour including fender R&R.
![Image]()
The flexible ratchet was used to break the screws loose, and put the final tighten on them at the end. The the thumb "wrench" allowed me to turn the screws w/ my "fingers." The "flat ratchet" was what I had used last time on the lower screw and it did work well.
Tool List:
Titan 11212 4-1/8-Inch Flex-Head Offset Micro Ratcheting Bit Driver and Bit Set
GEARWRENCH 35 Piece 1/4inch Drive MicroDriver Set - 85035
CRAFTSMAN 3-Pack Magnetic Screwdriving Bit Holder Set
Replaced the PCV Valve on my wife's '16 today. Thanks to all who posted tools to use. Last time I did one, my '15 (Spring 2020-ish), it took several hours. This time it took a bit less than an hour including fender R&R.
The flexible ratchet was used to break the screws loose, and put the final tighten on them at the end. The the thumb "wrench" allowed me to turn the screws w/ my "fingers." The "flat ratchet" was what I had used last time on the lower screw and it did work well.
Tool List:
Titan 11212 4-1/8-Inch Flex-Head Offset Micro Ratcheting Bit Driver and Bit Set
GEARWRENCH 35 Piece 1/4inch Drive MicroDriver Set - 85035
CRAFTSMAN 3-Pack Magnetic Screwdriving Bit Holder Set
436 posts
·
Joined 2014
I removed my fender and fender liner when I did mine. Made it much easier to do serpentine belt, front brake lines and front speed sensors at same time. But be prepared to buy new Christmas tree connectors , plastic fender rivets and those plastic connectors on the fender... its difficult to not break them when removing the fender. I chose to let my Jeep sit until I ordered steel fenders and fender liners the next day.
59 posts
·
Joined 2013
OK, did the PCV valve while I was in there doing the oil cooler. Great tip on removing the inner fender liner, that got me the hose removed and the bottom screw. The top screw was bested by super gluing a torx bit to the screw and using a 1/4 open end wrench moving 1 flat at a time. Don't want to do this ever again!
80 posts
·
Joined 2022
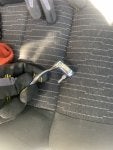
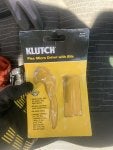
I also have done the pcv replacement. I really appreciate this thread. I used a couple things I learned here and it worked ok. Took about 2 hours for me. I moved the oil tube out of the way by unbolting it at the trans. The second bolt for it was missing on mine. I'll hsve to find a replacement. Then I used the little swivel ratchet with the T-25 bit. I worked on the top bolt first. Even with the tube out of the way it was still very tight and awkward. It required a lot of patience, effort, and luck to get it loose. Then I used the bit and my fingers to get it the rest of the way out. For the bottom bolt I took out the fender liner. No need to remove the fender itself. This allows access, but you can't actually see what you're doing when trying to get it loose. You have to go by feel and again it takes patience and luck. Space is tight. I can't see how this project could be done without the little ratchet I bought at the suggestion of a previous poster here.
View attachment 4538611
![Image]()
View attachment 4538611
View attachment 4538611
![]()
Amazon.com: Titan 11205 3-1/2-Inch Offset Micro Ratcheting Bit Driver and Bit Set : Tools & Home Improvement
Amazon.com: Titan 11205 3-1/2-Inch Offset Micro Ratcheting Bit Driver and Bit Set : Tools & Home Improvement
www.amazon.com
View attachment 4538611

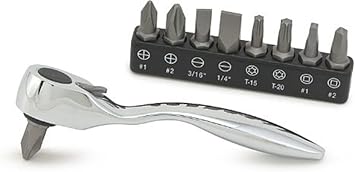
80 posts
·
Joined 2022
Oh, the ratchet set didn't come with the T-25 bit. I already had one. So consider buying one separately while you're ordering the ratchet so you won't be disappointed when it arrives.
-
?
-
?
-
?
-
?
-
?
-
?
-
?
-
?
-
?
-
?
-
?
-
?
-
?
-
?
-
?
-
?
-
?
-
?
-
?
-
?
- posts
- 9.1M
- members
- 496K
- Since
- 2005
A forum community dedicated to Jeep Wrangler owners and enthusiasts. Come join the discussion about reviews, performance, trail riding, gear, suspension, tires, classifieds, troubleshooting, maintenance, for all JL, JT, JK, TJ, YJ, and CJ models!


